How to Fix Drywall Patch Marks Showing Through Paint
Drywall is a common material for interior walls and ceilings in buildings and homes. While you can dress the material with a variety of textures and finishes, it is susceptible to dings, dents and scratches and even peeling tape covering the joints. Just painting over an improperly-patched blemish does not cover the problem, as the patch is often still fairly obvious. A better choice is to fix the blemish so that it blends with wall texture surrounding the area to be patched.
Scrape away any loose or raised particles, such as loose seam tape, from the patched area using a putty knife. Tap the area lightly with a flat-faced hammer to create a slight indention and loosen any remaining particles.
Apply a thin coat of drywall compound to the area using a drywall knife. When the area to be patched is a seam, apply a fresh piece of drywall tape over the compound on the seam, and then apply another thin layer of compound over the tape. Allow the compound to dry thoroughly.
Lightly sand the patched area using a drywall sanding pad to lower any slightly raised areas. Then, wipe any dust from the patch and apply a second thin layer of drywall compound, working outward a few inches from the perimeter of the first layer. Allow this layer to dry thoroughly, then repeat, working out a few inches in successive layers until you have completely feathered the patch and cannot see or feel any blemish.
Wipe down the wall and apply a coat of primer to the patched area and about a foot into the painted wall using a medium nap roller. Once the primer has dried thoroughly, apply two coats of finished paint from the same paint can used to paint the wall originally.

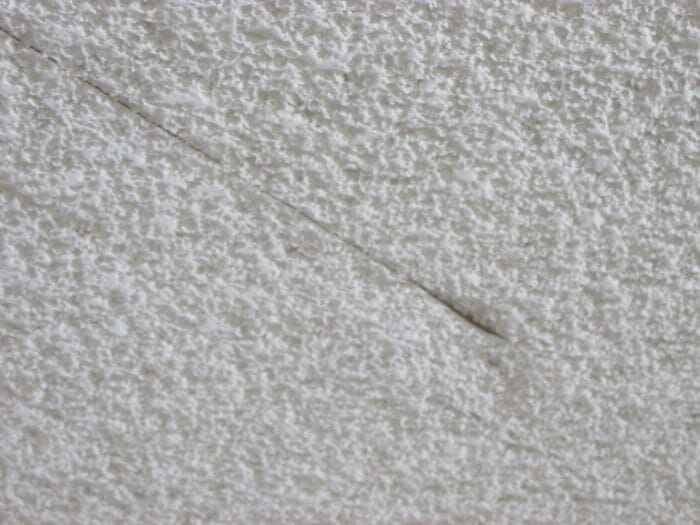
Drywall tape – loose, bubbles or wrinkled
Many homes experience loose or wrinkled dry wall tape at some point. Generally it is nothing to be alarmed about and just needs to be touched up or re-taped in a few places.
Drywall tape is normally embedded in drywall compound, usually called “drywall mud” by the tradesmen doing this type of work.
Most common causes
1. Probably the most common cause is that there was insufficient drywall compound applied to the taped joint or improper application. i.e. the tape did not get properly embedded into the mud on a hot summer day.
2. Moisture or dampness may also cause the tape to come loose. If the drywall had a high moisture content when the tape was applied or a high humidity condition came about, then there may be loose tape. Even too much water in a primer coat of paint that has been sprayed on to the drywall in the painting process may contribute to drywall tape coming loose.
3. Bubbles, technically called blisters, (usually caused by insufficient drywall compound being applied in the taping process) and wrinkles, may occur because of improper techniques in applying the drywall compound to the tape; perhaps an inexperienced drywall taper.
4. Occasionally movement of the wood from moisture content changes, truss uplift, seasonal movement of the slab or foundation, settlement or expansive soil issues may affect the taping.
How to Fix a Bad Drywall Tape Job
Joints between pieces of drywall are masked by a combination of drywall compound and tape. Over time, changes in moisture, settling of the home or quite simply, a bad tape job can cause the tape to peel away from the joint, leaving a blemish on the wall. Though the problem is just cosmetic, you do need to make some real repairs that, after painting, will be nearly impossible to discern from the rest of the wall.
- Remove any furnishings or other objects from the floor surrounding the area, and pull down any pictures or wall hangings nearby. Cover the floor beneath the damaged area with a drop cloth.
- Lightly sand the area with the damaged drywall tape using a drywall sanding screen. Then make a 1/8-inch deep cut around the perimeter of the bad tape with a utility knife. Peel away the damaged tape and drywall compound with a putty knife. Gently scrape the area to be repaired to lift up and remove any additional loose bodies.
- Apply a light coat of pre-mixed drywall compound to the area to be repaired, adding enough compound to work beyond the edges of the tape by a couple of inches in each direction. Cut a new piece of tape, and place it in position over the seam and drywall compound. Allow this compound to dry fully before proceeding.
- Cover the tape and previous compound with another thin layer of compound, adding about 2 inches of width in every direction. Gently slide a 10-inch drywall knife across the entire joint to scrape away any excess joint compound. Allow this layer to dry thoroughly before proceeding.
- Lightly scrape off any high points, then add a third layer of compound feathering another two inches in each direction. Allow this layer to dry thoroughly, then inspect the joint to see if you feel that a fourth or fifth layer should be added. If so, continue to add and feather new layers until the joint is smooth and even.
- Go over the area with a sanding block of very fine sandpaper — 220-grit or higher — to give the area a final smoothing. Wipe the joint with your hand, and sand any high points until it is completely smooth. If any low points are evident, add another layer of joint compound and repeat.
Alternatives to Drywall Tape
Using paper drywall tape to cover the joints where two panels of drywall meet is standard in drywall finishing. But there are many alternatives out there, each with different advantages and disadvantages. Some types of tape work best only for very specific applications, so check the product packaging to make sure an alternative tape will work for your construction project before testing it.
Mesh Tape
Fiberglass mesh tape offers a few advantages. First, it is easy to use. Just tear a piece off the roll and lay it on a layer of wet joint compound. Wipe it flat with your drywall tool. Then let it dry.
The second advantage of fiberglass mesh tape is it conforms well to oddly-shaped surfaces. For example, if you want to reinforce a round edge, lay a piece of fiberglass mesh tape on it and smooth it flat. Paper drywall tape, on the other hand, wrinkles easily.
The chief disadvantage of fiberglass mesh tape is that joints covered in only mesh tape tend to crack over time. While mesh tape certainly reinforces the strength of the joint compound, it doesn’t provide as cohesive a bond with the joint compound as paper drywall tape does.
Vinyl-Paper Composite Tape
A newcomer on the scene, vinyl-paper composite tape has changed how difficult angles are finished. Years ago, drywall finishers would have to use a chalk line to establish a straight line across tough angles and crooked corners. But now drywall finishers simply cut a length of stiff, cardboard-like vinyl-paper composite tape and embed it in wet joint compound. The vinyl-paper composite tape forms a perfectly straight line, leaving even the toughest angles clean and sharp.
Vinyl-paper composite tape has two main disadvantages. First, it is very expensive. A single roll of the tape can cost $20 to $30. In contrast, paper drywall tape costs only $2 to $4, depending on brand. Second, vinyl-paper composite tapes tend to dislodge over time. Due to the tape’s stiffness, seasonal shifts in temperature and moisture levels cause vinyl-paper composite tapes to crack and separate from the joint compound they are embedded in.
Metal Tape
Metal tape is the best product for covering wide-angle outside joints. It consists of two strips of metal glued to a paper drywall tape. Although new vinyl-paper composite products are emerging in the drywall-supply market that claim to cover wide-angle joints just as well as metal tape, many professionals still use metal tape. It is relatively inexpensive compared to newer products, and easier to install. Just cover the outside angle with joint compound, place a length of metal tape over it, and pinch the metal tape into place. Apply a few heavy coats of joint compound, and the wide angle is finished.
Adhesion
Mesh drywall tape has a tacky backing, allowing it to be self-stuck to the wall. Paper tape needs to be embedded in a layer of joint compound. This means that mesh tape is easier for the average person to install on a flat length of wall.
Most paper tape also comes with a factory crease in the center. This allows the installer to fold the tape in half, forming a right angle that makes it extremely easy to cover inside or outside corners. It is possible to fold mesh tape, but it’s easy to get off center if done by hand. If you want to use mesh tape on corners, use a specialty mesh tape corner applicator, and hit it with setting compound immediately. Of course, metal-reinforced paper tape makes for even easier installation and a very resilient corner!