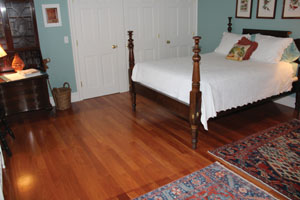
Preparing for Hardwood Floor Installation
First order of business was to remove all of the furniture, and then cut the carpet into four sections of 36-in. strips. This made it easy to roll the carpet into manageable strips and carry to the trash bin.
Once the carpet was removed we removed all of the carpet tack strips, swept the floor thoroughly and then installed 2-in. deck screws into the subfloor and floor joists approximately every 24 in. to help eliminate to possibility of flooring squeaks.
Flooring Moisture Content
Hardwood flooring needs to acclimate in the rooms where it is going to be installed for several days to allow it to adjust to temperature and humidity. Otherwise, if installed without acclimating, gaps and/or buckling may occur. Many contractors suggest leaving the wood on the jobsite for two weeks to acclimate well in hopes of preventing any issues.
The truth is that some wood flooring may already be at the proper moisture content when delivered. Allowing it to sit in extremely heavy humidity will only cause the wood planks to absorb unwanted moisture.
It’s best to know what the moisture content of your wood planks are at the time of delivery and what the expected moisture content will be in the room when it will be installed. I always ask the manufacturer what the flooring moisture content is and then double check with my moisture meter.
Lay Out the Room
Hardwood flooring should be installed on a solid, structurally sound subfloor. Whenever possible, determine the direction of your floor joists and plan on installing your plank flooring perpendicular to the joists.
Install 15-lb. Kraft paper underlayment on the entire floor, overlapping the roll edges by 3 inches. The Kraft paper acts as a vapor barrier. A utility knife is used to cut around objects like door jambs, radiators or other permanent objects. A few well placed staples hold the Kraft paper in place.
On this installation we were installing the hardwood flooring against the existing room trim so no shoe molding was to be used.
Select a few straight, long boards to start the first row. Using a table saw, rip the grooves off at a 15-degree angle to get the first starter row of planks to fit tight to the wall’s baseboard trim.
Tool setup is Critical
A proper tool setup is critical for installation. Locate your compressor and saw stand in a place where you can conveniently access the tools as well as the work you’re performing.
We took the time to measure from the opposite wall to determine if the room was square. You guessed it—it wasn’t.
Using a tape measure and snapping a layout chalk line a few feet out from the wall we were able to determine if the room was square or not. This is important information when determining how to rip the starter courses.
Your layout chalk line should be exactly parallel to the wall so you can make sure your floor boards are in alignment as you work your way across the floor installing them. From this mark, measure to the opposite wall to check for equal distance at both ends. If it isn’t parallel, the flooring won’t be either, so it may be necessary to slightly adjust your guideline.
It turned out that the starter course needed to be ripped a total of 1/2-in. over the course of 12 feet. Doing this step at the beginning of installation saved us time and aggravation later at the opposite wall, trying to get the last board to fit. We continually check our progress as we cross the room.
All about Nailing or Stapling your flooring down
If your installing 3/4″ thick solid wood flooring you will need to either rent or purchase a larger flooring nailer that is either a manual nailer that you swing and strike the top of the gun with a steel mallet several times to drive the cleat nail.
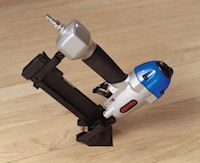
Or, you can rent or purchase a air assisted pneumatic nail gun and compressor where you strike the top of the nailing gun with a rubber mallet once which activates the air which drives the cleat or staple into the wood. The pneumatic nailer either the cleat nail style or staple style makes the job of nailing the flooring down easier.
Both types of nailers have a guide along the bottom front edge of the gun that keeps it aligned so that they will drive the nail or staple in the proper position along the inside top of the tongue of the boards. Both types of nailers can have an interchangeable base plate for thinner flooring.
When using 1/2″ or thinner solid wood flooring or thinner engineered flooring you will need to rent or purchase an easy pull trigger stapler that is also run by a small compressor to drive staples into the top inside edge of the tongue of the flooring. These type of nailing guns have an adjustable base plate to accommodate different board thicknesses. (Naturally click lock or direct down installations are not nailed.)
When starting the installation the first 2-4 rows of flooring you will not be able to fit in and use either of the nailers noted above. You will have to either pre-drill the boards and hand nail or you can use an air assisted finish nailer that uses a small compressor to drive nails either down through the top of the boards and/or if held at the proper angle blind nail on the inside edge of the tongues of the floor boards this is also true when installing your last rows of flooring against the finishing walls. The installation goes a lot faster using an air assisted finish nailer which uses the same small compressor as the above flooring nailers.
Proper nailing is essential to avoid any problems later. We suggest face nailing every 8 inches along the back side of the starting row and then blind nail every 6-8 inches along the tongue of every board thereafter staying 4 inches in from each end of the board to prevent the splitting of the wood boards.
Tips to Avoid the Pitfalls
Examine your subfloor
If your subfloor is in poor condition, putting down hardwoods won’t help. You need to have a relatively level subfloor, and any changes in height should be less than 3/16″ over a 6′ span. There are a couple different ways to level out a subfloor.
Acclimate the wood
Increased moisture causes wood to expand while less moisture causes wood to contract. This is called wood movement. It’s important for hardwoods to acclimate in the space where they will be installed. Wood that is not fully acclimated will result in gaps during the winter and possibly cupping during the summer. To avoid this, open and spread out the boxes for about a week, and be sure to run the A/C or heat at normal levels. Never store the hardwoods in a moisture rich environment like an unfinished basement.
First Row Must be Straight
It’s very important for the first row of hardwoods to be installed straight as every row after will be laid relative to it. A crooked first row will result in large curves as you progress through the space. Exterior walls are often not square so consider marking a line parallel to an inside wall, opposite of your starting position. Mark the locations of your joists and install the hardwoods perpendicular. Make sure you drive a fastener into a joist at each opportunity. Consider what obstacles, like a fireplace hearth, are present how different starting points will make the job easier.
Top nail and glue the boards
You’ll encounter scenarios where the flooring nailer will not fit, like when laying the last board. Invariably, you’ll need to top nail or face nail these boards. Grab your wood glue and add a bead to the groove of the previous board. Use scrap wood and a pry bar to securely wedge these boards in place. Be sure to hold the finish nailer with adequate force to prevent it from jumping around and marring the surface of the board.
Maintenance Instructions & Helpful Tips
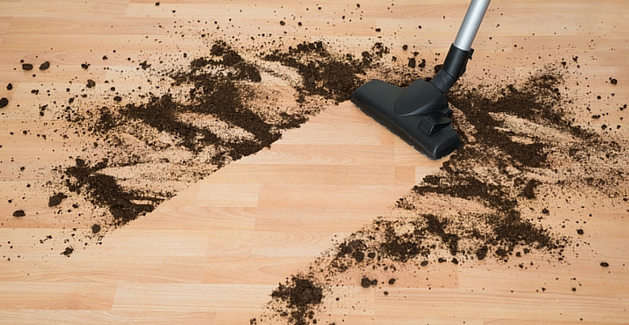
- Vacuum your floor every week. Fine grit and dust is just like sandpaper and will slowly wear through your wood floor’s finish. So a good vacuuming protects the finish as well as keeps up its appearance.
- Wipe up spills immediately. Make sure you wipe up spills immediately with a slightly dampened towel.
- Watch the hairspray and the furniture polish. Both of them can cloud your floor’s finish. Wipe them up immediately with a damp cloth. For a more thorough cleanup, you can spray the area with non-ammonia window cleaner and immediately wipe it up.
- Keep out the rain. Water can not only ruin the finish on a hardwood floor but can penetrate deep into the wood and stain it. Immediately wipe up any water spill on your hardwood floor.
- Remove residue with no-wax wood floor cleaner. Wipe up spills and dirt immediately; then use the cleaner to remove the residue. Dirt can damage the finish or get ground in. Liquids can damage the finish or stain the floor.
Down the Road:
Routine maintenance is key to preserving wood floors, so put these three tasks on your to-do list in the future:
Get your floors deep cleaned and add a fresh coat of finish every three to five years. Make sure you know what type of finish your floors already have (oil, wax, urethane) because you’ll need to reapply that same kind.
Whatever you do, resist sliding furniture. Enlist a friend and pick things up to move them.
Every few decades, sand and refinish wood floors to make them look new again. Typically, solid, wood floors can be re-sanded five to ten times during the expected lifespan. The beauty of wood flooring is its ability to become like new with a fresh finishing coat and a deep cleaning. If you’re not sure if it’s time for a fresh finish, check with an expert first.